A correctly installed mechanical pipe coupling holds full pressure for decades. A poorly installed one leaks within months, sometimes within hours. The difference is rarely the coupling itself — most modern couplings from reputable manufacturers (JWC, Aju, Victaulic, Romacon, Smith-Blair) ship from the factory ready to perform. The difference is the discipline of the installation: how the pipe ends are prepared, how the gasket is seated, how the bolts are sequenced, and whether the final torque is verified against a real specification rather than guessed.
This guide walks through the standard installation sequence for the three coupling types most commonly found on Singapore industrial and marine piping — grip-type, slip-type, and grooved mechanical couplings — with the field-level details that separate a coupling that lasts from one that fails on commissioning.
Before You Start: Tools and Materials
Every installation needs the same core kit. Skipping any of these almost always shows up as a leak.
| Item | Purpose |
|---|---|
| Wire brush or stiff non-metallic brush | Clean pipe ends of mill scale, rust, dirt, and old gasket residue |
| Tape measure or insertion-depth gauge | Mark the correct insertion depth on each pipe end |
| Permanent marker | Mark the insertion line so it stays visible during fit-up |
| Approved gasket lubricant (silicone or food-grade per service) | Ease gasket seating without contaminating the line |
| Calibrated torque wrench | Achieve the manufacturer’s specified bolt torque — not “tight enough” |
| Socket set sized to the coupling’s bolt heads | Standard sizes are M10 / M12 / M16 / M20 depending on coupling diameter |
| Spirit level or alignment gauge | Confirm pipe-to-pipe alignment within tolerance |
| Clean rag or shop cloth | Final wipe-down of pipe ends and gasket sealing surface |
The torque wrench is the one item people skip most often and regret most expensively. A standard hand wrench produces wildly inconsistent torque. Below the manufacturer’s spec, the gasket does not seal. Above it, the coupling housing distorts and the gasket extrudes. Both fail.
Step 1 — Inspect the Pipe Ends
Before any coupling component touches the pipe, the pipe end has to be in spec. The mechanical coupling seals on the outside surface of the pipe, so any defect in that surface becomes a leak path.
Check each pipe end for:
- Out-of-round beyond manufacturer tolerance (typically ±1% of OD for grip-type, tighter for grooved)
- Mill scale, rust, paint, or coating in the gasket-contact zone
- Weld spatter, sharp edges, or dings along the insertion length
- Gouges, scratches, or pitting deeper than 0.5 mm in the gasket-contact zone
- Ovality that prevents the gasket from seating uniformly
Any of these defects must be remedied before installation. Mill scale and rust are removed with a wire brush or non-metallic abrasive pad. Sharp edges are filed flat. Significant ovality usually means cutting the pipe back to round material. Do not install a coupling on a pipe end that is out of spec — there is no field workaround that recovers a compromised seal.
For complete out-of-tolerance numbers by size, see pipe coupling size chart DN15 to DN300 which lists nominal OD and acceptable tolerance for each size.
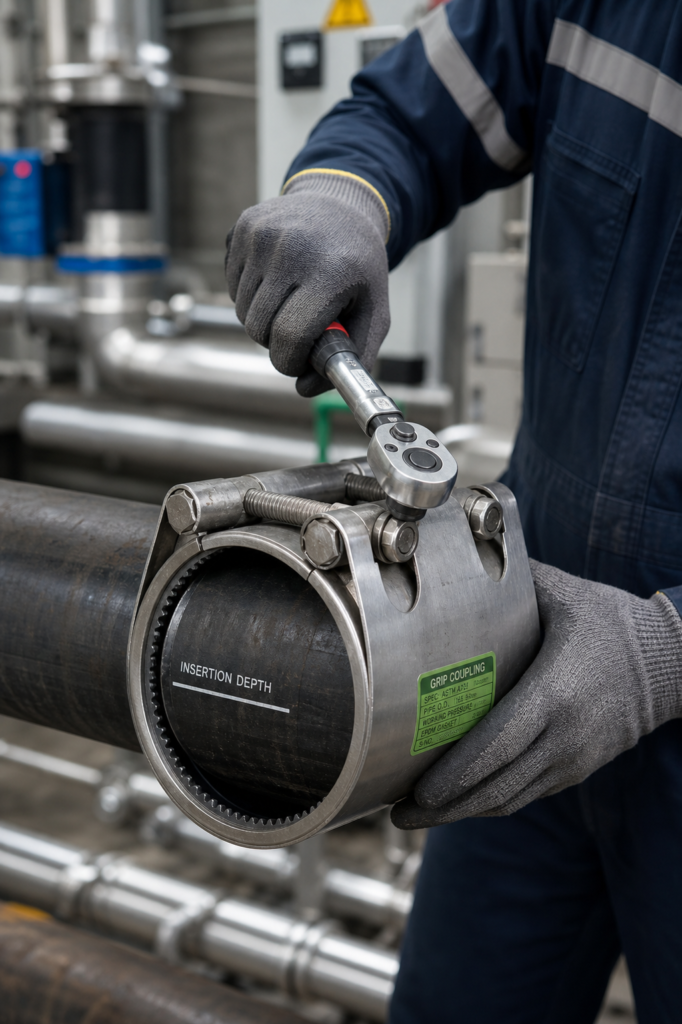
Step 2 — Mark the Insertion Depth
Every mechanical coupling has a manufacturer-specified insertion depth — the distance from the pipe end to the centreline of the coupling housing, with the two pipe ends butting (or near-butting) inside the gasket. Marking this depth on the pipe before installation is the single most important step for getting the joint right.
To mark insertion depth:
- Measure the housing length and divide by two for the centreline mark
- Add the manufacturer’s recommended pipe-end-to-centreline distance (typical: 25–50 mm for DN50–DN150 grip-type)
- Use a permanent marker to draw a line around the full circumference of each pipe end
- Verify the line is visible and unambiguous before fit-up
When the coupling is finally tightened, the housing edges should sit on the marked lines on both pipes. If they don’t, the joint is over- or under-inserted, and either condition causes the gasket to seal incorrectly.
Step 3 — Inspect the Coupling Components
Open the coupling kit and check every component before fit-up:
- Housing or band: no dents, cracks, or coating damage
- Gasket: correct material for the service (EPDM for water, NBR for oil and fuel, Viton for chemical or high-temperature). Check for tears, set, or contamination
- Bolts, nuts, and washers: correct grade, no thread damage, no rust
- Grip rings (grip-type only): intact, no tooth damage
- End rings or follower rings (slip and expansion types): flat, no warpage
Wrong gasket material is the second most common cause of premature joint failure after under-torqued bolts. If the gasket compatibility is unclear, refer to NBR vs EPDM vs Viton gaskets for pipe couplings before installing.
Never install a coupling with a damaged gasket. The cost of a replacement gasket is a fraction of the cost of a leak repair on a live system.
Step 4 — Apply Gasket Lubricant
A small amount of approved gasket lubricant on the inside lip of the gasket and on the pipe end makes the difference between a gasket that seats squarely and one that rolls or pinches as the housing closes.
Use the lubricant specified by the coupling manufacturer. Silicone-based lubricants are standard for water and HVAC service. Petroleum-based lubricants will damage EPDM gaskets and must not be used on potable, chilled water, or condenser lines. For potable service in Singapore, the lubricant must be compatible with the gasket’s SS 375 / BS 6920 testing, otherwise the joint loses its potable certification.
Apply a thin, even film. Excess lubricant can collect debris and contaminate the line on first flush.
Step 5 — Position the Coupling
The procedure here splits depending on coupling type.
Grip-Type and Slip-Type Couplings (One-Piece Sleeve)
For couplings that come as a one-piece stainless or rubber sleeve over the pipe (typical of JWC MJG, MJS, and MJH series, and equivalent Aju and Romacon ranges):
- Slide the coupling fully onto one pipe end, past the insertion line
- Bring the second pipe up to the first, aligned on a common centreline
- Slide the coupling back over the joint until the housing edges align with the insertion lines on both pipes
The pipe ends should butt or near-butt at the centreline of the coupling. Some manufacturers specify a small gap (typically 5–10 mm) between pipe ends; check the datasheet.
Multi-Lock Couplings (Hinged or Bolted Housings)
For couplings that open like a clamp (JWC MJD multi-lock, MJH hinge clamp, Romacon RS series, and grooved couplings):
- Open the housing fully — for hinged designs, undo only the locking bolts; for bolted housings, separate the two halves
- Lay the gasket onto one pipe end, then position the second pipe up to the first
- Wrap the gasket around both pipes, ensuring the sealing lip seats on both pipe surfaces
- Close the housing around the gasket and align the housing edges with the insertion marks
- Insert all bolts hand-tight before any torquing begins
For grooved couplings (Victaulic, Gruvlok), the housing keys must seat into the pipe grooves. Listen for the audible click as each key drops in. If a key is not seated, the joint will not hold pressure.
Step 6 — Tighten the Bolts in Sequence
This is where most field installations go wrong. Bolts must be tightened in a cross-pattern, in stages, not in a single pass around the housing. A single-pass tightening loads one side of the gasket while the opposite side is still loose, causing the gasket to roll or extrude on the loaded side.
Standard sequence for a four-bolt housing:
- Hand-tighten all four bolts until snug
- First pass — torque each bolt to 30% of final spec in cross-pattern (1, 3, 2, 4)
- Second pass — torque to 60% of final spec in same cross-pattern
- Third pass — torque to 100% of final spec in same cross-pattern
- Final pass — re-torque each bolt at 100% spec without removing or loosening, to confirm no further travel
For six- and eight-bolt housings, use the standard alternating cross-pattern (1, 4, 2, 5, 3, 6 for six bolts).
Final torque varies by manufacturer, size, and coupling type — roughly 30 N·m on small DN50 grip-type couplings, up to 200+ N·m on large multi-lock couplings. For context on the differences between common JWC series and which torque band each falls into, see MJG vs MJD vs MJS couplings: how to choose.
Never use an impact wrench on the final torque pass. Impact wrenches cannot deliver controlled torque and routinely overtorque bolts by 30–50%. Use them only for the initial run-down, then switch to a calibrated torque wrench for the staged tightening.
Step 7 — Verify Alignment and Final Position
Once the bolts are at final torque, confirm the joint geometry before pressurising:
- Insertion depth: both housing edges sit on the marked insertion lines
- Pipe alignment: the two pipes share a common centreline within tolerance (typically ±2° angular for standard couplings; tighter for rigid grooved)
- Housing seating: the housing has not rolled or shifted off-square
- Bolt visibility: all bolt threads protrude past the nut by at least one full thread
If anything looks wrong, do not pressurise. The coupling does not become safer once it is full of fluid.
Step 8 — Hydrostatic Test
For pressurised systems, every coupling installation should be hydrostatically tested before commissioning. The standard test is 1.5 × design pressure for 30 minutes, with no measurable drop or visible leakage at the joint. Marine and PUB potable water systems often specify their own test pressures and durations — check the project specification.
During the test, watch the joint specifically. A coupling that is going to leak will usually show a small bead of water at the housing edge or at a bolt seam within the first few minutes. If a leak appears, depressurise fully before attempting any correction. Never tighten bolts under live pressure — the bolts can fail and the coupling can release explosively.
Common Installation Mistakes
Five mistakes account for the vast majority of premature mechanical coupling failures in the field:
- Skipping the cross-pattern bolt sequence. Tightening straight around the housing rolls the gasket. Use staged cross-pattern every time, even on small couplings.
- Wrong gasket material for the service. EPDM on a fuel oil line fails within months. NBR on a hot chemical line fails within weeks.
- Pipe end out of spec. Out-of-round, scaled, or gouged pipe ends cannot be sealed by any coupling design.
- Insertion depth not marked. Joints under-inserted or over-inserted will not seal correctly even at full torque.
- Final torque guessed rather than measured. Hand-feel torque varies by 50% installer-to-installer. A calibrated torque wrench takes one minute and removes the guesswork.
Key Takeaways
- A mechanical pipe coupling installation is only as good as the pipe-end preparation that precedes it. Inspect, clean, and mark insertion depth before any coupling component is touched.
- The bolt-tightening sequence — staged cross-pattern, 30% / 60% / 100%, re-torque — is non-negotiable. It is the single biggest determinant of whether the joint holds.
- Use a calibrated torque wrench for the final pass. Hand-feel torque is not specification.
- Hydrostatic test every joint before commissioning. Leaks shown on test are a fraction of the cost of leaks shown on commissioning.
About David Phee Enterprise
David Phee Enterprise is the exclusive Singapore distributor for Jeong Woo Coupling (JWC) and a long-standing supplier of Aju, Romacon, and Smith-Blair pipe couplings, repair clamps, and expansion joints. Operating from Empire Technocentre in Kaki Bukit, DPE supplies ship chandlers, shipyards, and industrial contractors across Singapore, Malaysia, and Indonesia with same-day delivery on stocked items and full installation support including torque specifications and gasket compatibility advice. Visit davidphee.com for installation queries, technical datasheets, and stock enquiries.
1 thought on “Pipe Coupling Installation Guide: Step-by-Step”